Vector files for embroidery: from image to SVG to PES or DST
Your customer sends a logo as a JPG, someone asks for "the vector file", and the machine wants a PES. Here is what each file is, what the stitch file needs from the vector, and the fastest honest route between them.
By the VectoSolve design team, technical review by Robin Monteiro, founder and developer. First published January 2026, rewritten 12 November 2026.
- An SVG, AI or EPS is a drawing. An embroidery machine cannot sew it.
- A PES, DST or JEF is a list of needle positions, colour stops and trims, made for one size.
- Getting from one to the other is called digitizing. A clean vector makes it faster, cheaper and better, whoever does it.
Vector file or embroidery file: what is inside
| Vector (SVG, AI, EPS) | Stitch file (PES, DST, JEF) | |
|---|---|---|
| Contains | Shapes: outlines and fill colours | Needle moves, stitch types, colour changes, jumps and trims |
| Size | Any size, no quality loss | One size; small changes only |
| Colours | Exact colour values | Thread stops; DST stores no colour at all |
| Opens in | Illustrator, Inkscape, Design Space | The machine, embroidery software |
| Machine can sew it | No | Yes |
That is why "vector file conversion for embroidery" usually means two jobs: first clean vector art from whatever the customer sent, then stitches from that art. Shops often pay for both separately. Our page on digitizing vs vectorizing covers the difference in more detail.
Which stitch file your machine reads
| Format | Machines | Note |
|---|---|---|
| PES | Brother, Baby Lock | Home and small business machines; stores thread colours |
| JEF | Janome, Elna, Kenmore | Thread colours as Janome palette numbers |
| DST | Tajima and most commercial machines (Barudan, ZSK, Ricoma, Happy, Melco) | Universal, but colour-blind: you pick threads at the machine |
| EXP | Bernina | We do not write it; many Bernina setups import DST |
| VP3 | Pfaff, Husqvarna Viking | We do not write it; check whether your software imports PES or DST |
What a good stitch file needs from the vector
Thread is not ink. It has thickness, it pulls the fabric, and it cannot draw a detail smaller than itself. The rules below are the ones digitizers apply; treat them as starting points and check them against your own machine and fabric.
- Size first. Decide the stitched size before anything else. Common Brother hoops are 4x4 in (100 x 100 mm), 5x7 in (130 x 180 mm) and 6x10 in (160 x 260 mm). A left-chest logo is usually 3 to 4 in wide.
- Lettering of at least about 1/4 in (6 mm) in capital height. Smaller text closes up, especially on towels and fleece.
- No line thinner than about 1 mm. Thinner lines sew as a broken run or disappear.
- Few colours. Every colour is a thread change. Six to eight is plenty for a logo; a photo with sixty shades is not an embroidery design.
- Flat fills, no gradients. A gradient has to become separate thread colours or a stitch effect, chosen by a person.
- No background shape. A white rectangle behind the logo becomes a block of white stitches.
A real example: one photo, one DST file
This is a real conversion made on 2 October 2026 with our embroidery converter, from a photo of a cut-metal weathervane. The right-hand picture is not a mock-up and not a photo of a stitch-out: it is drawn from the DST file itself, stitch by stitch.
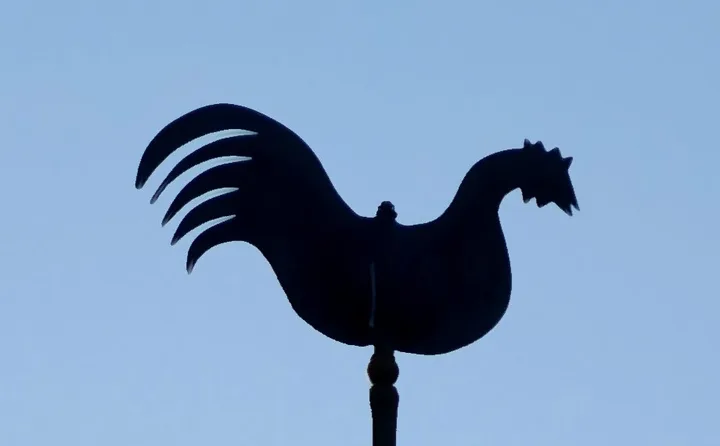
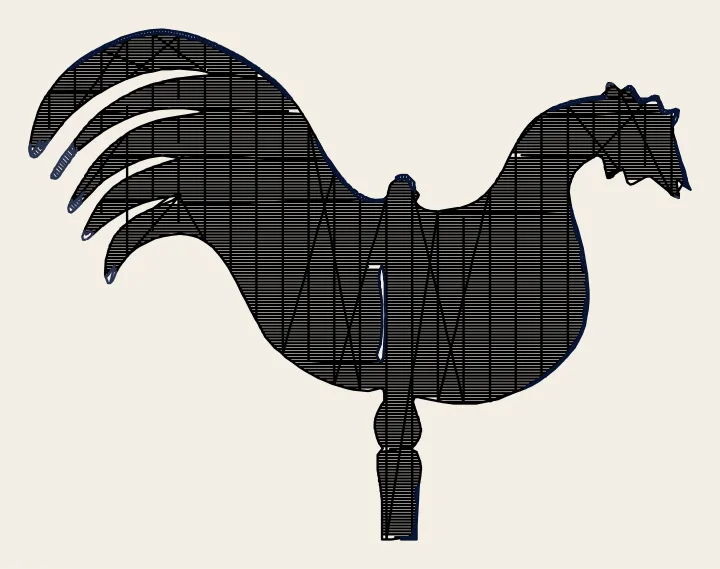
- 5,940 stitches, 3 thread colours, 90 x 69.3 mm, fitted to a 4x4 in hoop.
- About 8 minutes on a home machine.
- The sky was removed before tracing, so no background is stitched.
What it is not: the fills are running stitches and zigzag rows, not hand-placed satin columns. You can see the straight travel lines between areas; your machine trims or you clip them. That is right for a patch, a tea towel or a cap, and wrong for fine lettering on a polo. We have not sewn this file for this article; the stitch drawing is the evidence, and a test stitch on your own fabric is still the rule.
Three ways to get from vector to stitches
1. Auto-digitizing (minutes)
Upload a picture or an SVG, get a stitch file. Our image to embroidery converter traces the picture, reduces the colours, fits the design to the hoop before generating stitches, and gives you DST, PES and JEF together. If the design cannot sew, it is refused rather than delivered broken. Start from an SVG you already have with SVG to PES or SVG to DST.
Best for bold logos, patches, silhouettes, pets in flat colours.
2. Digitize it yourself
Embroidery software lets you choose the stitch type, direction and density for each shape. Ink/Stitch is a free extension for Inkscape; Hatch, Wilcom EmbroideryStudio and Brother PE-Design are paid. Import your clean SVG, assign satin to borders and lettering, fill to large areas, then export the format of your machine. Expect a learning curve of a few weekends before results are reliable.
3. Pay a digitizer
A person redraws the design as stitches by hand. Online digitizing services advertise prices from around $10 for a small, simple design, rising with stitch count and detail, usually with a one or two day turnaround. Send them a clean vector rather than a screenshot: it saves them time and saves you a revision.
Which route for which design
| Design | Route |
|---|---|
| Bold logo, 2 to 4 colours, patch or cap | Auto-digitizing, then a test stitch |
| Silhouette or pet portrait in flat colours | Auto-digitizing |
| Small lettering, satin borders, left-chest polo | Digitizer, or your own software |
| Photo with shading | Simplify to flat colours first, then either route |
| Dozens of customer logos a month | Auto-digitizing for the simple ones, digitizer for the rest |
Preparing the vector: a checklist
- Start from the best source you have. If it is a JPG or a screenshot, convert it to a clean SVG first and check every shape.
- Set the final size and the hoop.
- Merge similar shades into one thread colour.
- Delete the background shape and anything that will not be sewn.
- Thicken lines under 1 mm, enlarge or drop text under 6 mm.
- Convert text to outlines so fonts cannot change.
- Save as SVG, then generate the stitch file at that size.
Mistakes that cost a re-stitch
- Scaling a PES by 50 percent instead of regenerating it: stitches bunch up or open gaps.
- Sending a JPG to the digitizer and expecting the same price as for a vector.
- Trusting a DST for colours. DST has none; write the thread order down or use PES or JEF.
- Skipping the test stitch. Same fabric, same stabilizer, before the production run. Always.
Questions
Can I convert an SVG straight to PES or DST?
Yes, with digitizing software or an auto-digitizing converter: it reads the shapes and colours of the SVG and generates stitches for them. The cleaner the SVG (flat colours, closed shapes, no gradients), the better the stitches. Our SVG to PES and SVG to DST converters do this in the browser.
Can I open a PES or DST file in Illustrator or Inkscape?
Not as stitches. Design programs read paths, not needle positions. To see or edit stitches you need embroidery software, such as your machine maker's program, Hatch, Wilcom or the free Ink/Stitch extension for Inkscape.
Can I resize an embroidery file?
Only a little. A stitch file is built for one size: the stitch count and spacing are fixed. Most digitizers advise staying within about 10 to 20 percent; beyond that, go back to the vector and generate the stitches again at the new size.
Is auto-digitizing as good as a professional digitizer?
For bold shapes in a few colours, such as a patch, a cap logo or a silhouette, it is often enough. For small lettering, satin borders and fine detail, a person still does better, because they choose stitch direction, underlay and pull compensation shape by shape.
What is the difference between vectorizing and digitizing?
Vectorizing turns a picture into clean shapes (SVG, AI, EPS). Digitizing turns shapes into stitches (PES, DST, JEF). Embroidery needs both, in that order.
Turn your design into a stitch file
DST, PES and JEF from one upload, fitted to the hoop, with the stitched size shown in millimetres before you pay.